CONCEPTUALIZATION
Robot Love
Robot Love is a short film that tells a story about a young lady called Leila who decides to buy herself a male robot to be her soulmate.This film involves blending 3D animation with live action film to achieve the objective of the film.I am still working to complete the film, however i need to access more resources like better voice recorders and acters as well.
16.12.2010 3D Pre-Viz
This is our last project this semester,we have been asked to do this in groups and i had fun working with LarsErik,Ingrid and Michell as my group members.
We started our work by first discussing what we were going to do and decided what each one of us will be doing.First we agreed to base our project on Lars-Erik's treatment,its a story about someone dreaming about being invaded by a thief,he wrestled the thief and overcame the challenge then called in the police to come and arrest him.Incidentally the police was looking for this same thief so they were happy for the good job done for them,the police decided to reward him with a sack of money but just when he was receiving the money,then he wakes up from his dream.He felt bad that it was not real,just a dream!
We made a story board from which we created an animatic video as shown in the link bellow:
From our animatic video,we chose a few scenes from which we created a 3D previz as shown in the link bellow:
I am generally happy about what we achieved in this project working as a team,i personally contributed in partly drawing some pictures for the story board and working on some parts for the 3D previz.
This another semester completed,i feel i have learnt alot and look forward to the coming semester.
MERRY CHRISTMASS AND A HAPPY NEW YEAR!!!
This another semester completed,i feel i have learnt alot and look forward to the coming semester.
MERRY CHRISTMASS AND A HAPPY NEW YEAR!!!
TREATMENT-05.12.2010
In in this project i really had a lot in my mind and had problems choosing what to write about, finally i decided to write my treatment from a true story but i had to make some adjustments to cut the long story short.
Ajok in rebel captivity
AJOK in rebel captivity is a character driven story about a beautiful high school girl who goes through a horrible dramatic ordeal when she is forced to be the wife of a notorious rebel leader.
Act 1
Ajok is in her second year at a very good girls boarding high school where she is studying sciences with the hope that she joins the University for a Medical Course. She is among the brightest in her class, responsible and liked by everyone in her school because of her good track record. One night, at an awkward time in the night, Ajok is woken up by a loud bang on the door, while still wondering what to do then a second bang flings the door open. Immediately several men rush in with guns ordering them to all stay in one line, they did not have a choice but to do as ordered.
The shabby looking gun men ruthlessly tie all their hands together and then order them to march out while their hands tied together. Ajok realizes that the same has been done to girls from other dormitories and they are all being marched outside the school towards the jungle while the whole school is set on fire.
Act2
As they walk in the jungle, Ajok is planning her escape but she is in a dilemma, her hand is tied and she cannot be able to run fast with the hands still tied, she realizes that she needs the help of her close friend. Ajok suggest the escape idea to her friend who agrees to help untie Ajok’s hands and she equally does the same to her friend.
They decide to sneak at a time when no rebel seemed to have an eye on them, immediately they are out of sight from the rest they start to run for dear life. Suddenly they come face to face with one of the rebels, he stayed behind while peeing. The rebel orders them to stop or he shoots, immediately they stop while panicking, knowing very well a heavy punishment awaits them.
The rebel brings Ajok and her friend before a disciplinary committee, who executes her friend first, she is next. She is already peeing on herself before the trigger is pulled, then the rebel leader stops the execution of Ajok, she does not know the reason. The rebel leader walks up to Ajok and tells her that she is going to be his wife.
Act 3
Later in the night Ajok wakes up to heavy bombing of the rebel hideout by government forces, she quickly get on her feet and runs for her dear life. She keeps running until she is ordered to stop by a group of men pointing guns at her. She is very happy to realize that these were government forces coming to rescue them. Ajok and other former captives are transported back to their homes, on arrival the whole village was waiting, the press was everywhere and local leaders were present as well. For Ajok and her family it is a happy reunion, they are all filled with tears of happiness. That evening the whole village gathered to celebrate, Ajoks’ former school mates were also invited and they were all happy to see her again.
End
08.11.2010 Digital Acting 2-Lip Sync
Planning
I started this project by first researching on what audio speech I would love to use in creating a lip sync animation for this project. My search for the audio speech started on internet where I went through many websites but was not able to find something I really liked and I resorted to the school server. From the school server I got an audio speech ‘peoples skills’, this was ironical because the tone in the speech did not reflect the peoples skills mentioned in it. I decided to use ‘peoples skills’ audio speech because I found it interesting and challenging enough which is good for my learning experience.
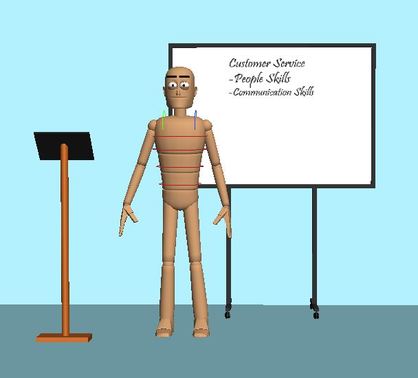
Before making up my mind on this audio I had to think about a story to use for the animation, basing on the audio content I figured out my character giving a lecture about ‘peoples skills’ to an audience in a work related meeting.
Having decided on the audio and story, I moved on to find a character rig and design a scene for the animation. I checked out some character rigs to find out which one I feel comfortable to use for this assignment, Max rig shown bellow was good enough.p { margin-bottom: 0.21cm; }
Fig1. Max rig
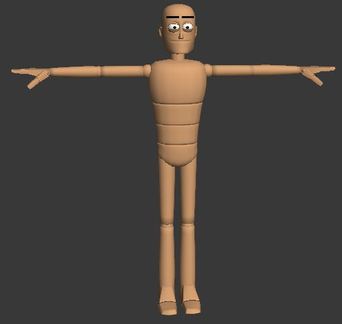
Fig 2. Scene design-sketch
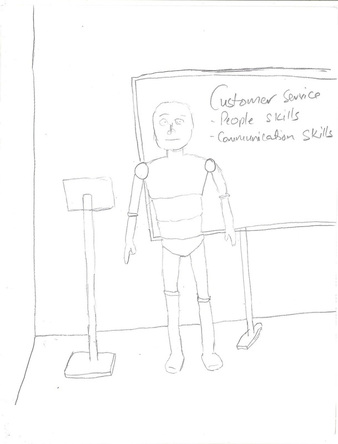
Fig 3.Scene design-3dmax
With all this work done so far, it was now time to get down to animation and to achieve this, I resorted to the most logical thing to do in animation, using the principles of animation .I went through the 12 principles of animation and picked a few of them that were most appropriate for me to use in animating my character.
Staging
I drew a number of poses on paper and used them as reference to pose my character for staging in 3d max.
Link to staging video:http://www.youtube.com/watch?v=DWmDOsvW9qY
I staged the animation to give an impression of an irritated person who is giving a lecture on people skills, this corresponds to the tone of the audio voice.
Straight ahead action and pose to pose
After staging I used straight ahead action and pose to pose animation to fill the intervals and create a more fluid and dynamic illusion of movement.
Timing
I made adjustments between the frames so that the movement of my character appears more natural and realistic.
Follow through and overlapping action
I animated my characters hands to continue moving after the main hand stopped, this creates an overlapping action for realism.
Summary
I was able to use the four principles of animation successfully in animating my character and also had some time to make final adjustments with the help of the curve editor.
Link to final animation:
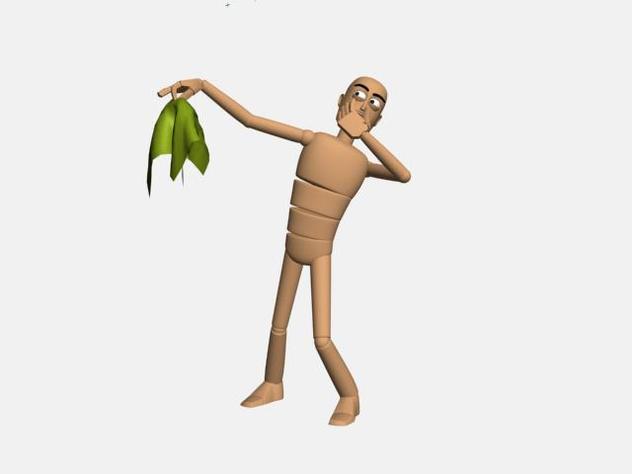
13/10/2010 Posing Assignment
Here i posed this character reacting to a smelling piece of cloth.
Here i posed this character reacting to a smelling piece of cloth.
13/10/2010 Posing Assignment
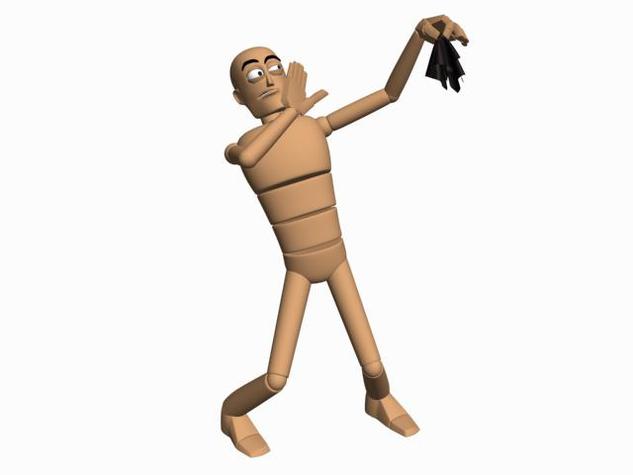
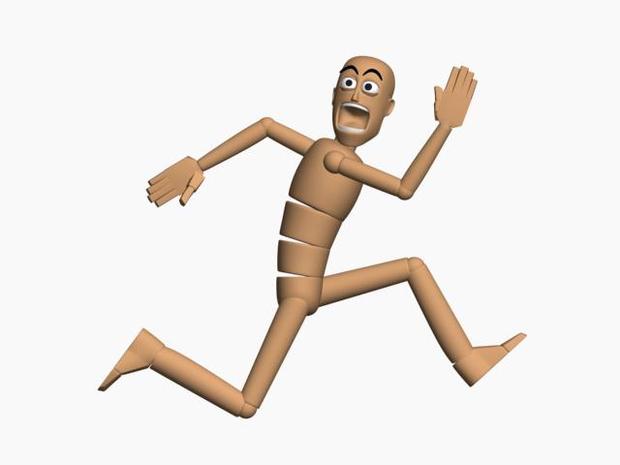
Character confronting an opponent!
Character confronting an opponent!

Openent chickening out!!!!!!!...................on his heels for dear life!
Sammary-01/10/2010
I am generally happy with my character design, it feels good that through my efforts I made something that I am proud to show. I was able to complete the character design like I expected though I was caught up with time and did not build the 3d accessories to my best level, this was due to the fact that I started in Maya. However, I was able to learn something in Maya and probably my efforts will yield some results when I start posting elements developed in Maya.
That was it for this project, don’t miss out on the coming postings……am sure you will love them, things here will keep getting better and more exciting, just like wine gets better with time.
3D elements-27/09/2010
I modeled 3d accessories from my character design, I started by working in Maya with the intentions of getting to learn the program. I had a good start but it got complicated for me at some point while I was running out of time with the assignment! So I decided to go back to 3ds max that I am used to and suspended Maya till when I have some good time for it, I believe it’s worth learning how to work with Maya as well.
Character Design-23/09/2010
Having decided on my pre-1960 story, it was now time to design a character that was going to portray these bad guys. Throughout my research I was able to have a clue on how people dressed around that time, so in my design I decided to dress him up so that he fits in those times and also gave him some kind of mean look like shown bellow on a model sheet;
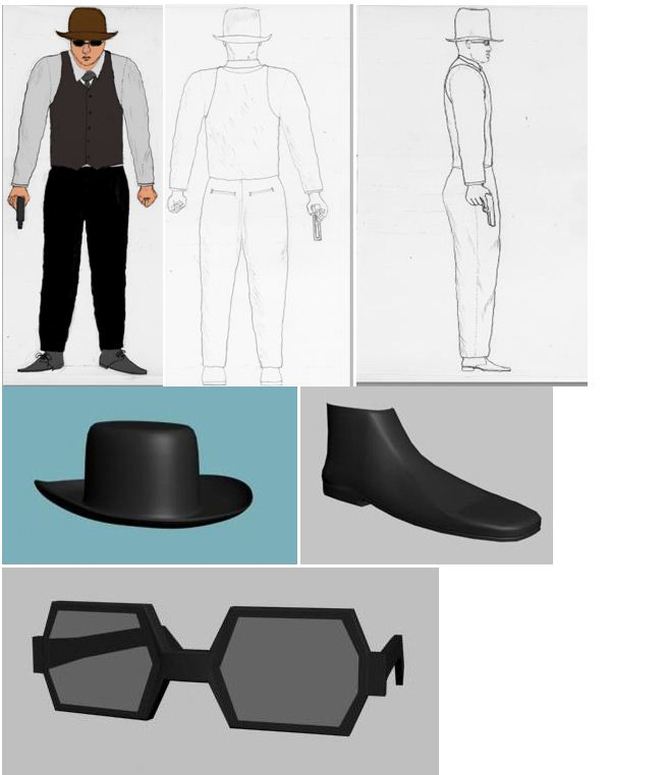
As shown above, my design include the characters front, side, back views and some 3d accessories to define this guy.
I designed him in mainly a mixture of dark colors, this reflects his wild mind, unlike an average responsible person who would most likely in those times have same color combination for the trouser and waist coat.
At that time if you ever mention the name Dillinger you immediately see a reaction of fear in people, so I needed to instill this fear from just the look on my design and that’s why I included a gun in his hand. The combination of a gun, dark glasses, a hat and a mean face sends a not so friendly message; this is exactly what I wanted to show from my character design. If this guy reported on duty and approached any bank teller, they would definitely pack for him all the money as fast as possible!
3DFP-Project 2(Character Art)-20/09/2010
Find a piece of text from a pre-1960 story about gangs.
Be influenced by this chosen text to design a character that looks part of a 'gang' of other characters.
Present your final character design in a model sheet.
Model a minimum of three accesories from your character design. One accessory must be footwear (or barefoot).
In the model sheet include renders of accesories ( 2d and 3d elements) and visualization of character analysis.
Complete a minimum of one (1) full colour hyper-linked reflective journal post.
Planning-20/09/2010
This is just another task at hand, I am now used to this and know what exactly I have to do when faced with challenges. All I needed to start with is exactly what is running through my mind now, planning! Basing on this assignment, I realized that there is nothing I could do before I find this pre-1960 piece of text story about gangs. Many times I would write down some order in which I will be working but this time round looks like the assignment has dictated the order in which we ought to work, so searching for the piece of text is what I have to do
Research
I immediately started my research on internet because this was a readily available option, going to the libraries would take me some time of travel and probably I would have to go through a pile of documents in my search. My search on internet did not seem easy like I thought it would be, first I checked through prominent newspapers like Newyorktimes but realized that they were not posting articles on internet at time. I came across some articles that quoted old stories in some newspapers but this is not what I wanted, I wanted the real text from the old newspaper. I gave Google news a shot and got many gang stories but most of them were not pre-1960 newspaper articles. My search needed a lot of patience because I also had to read the news, decided if it was good enough article and probably move to the next. With some good effort that was worth it I came across a very nice story, this was about a gang that made headlines in the USA. This was a gang (Dillinger gangsters) that terrorized and smartly robbed banks earning them a place among the FBI most wanted criminals ,more about them can be found on this pre-1960 Google link
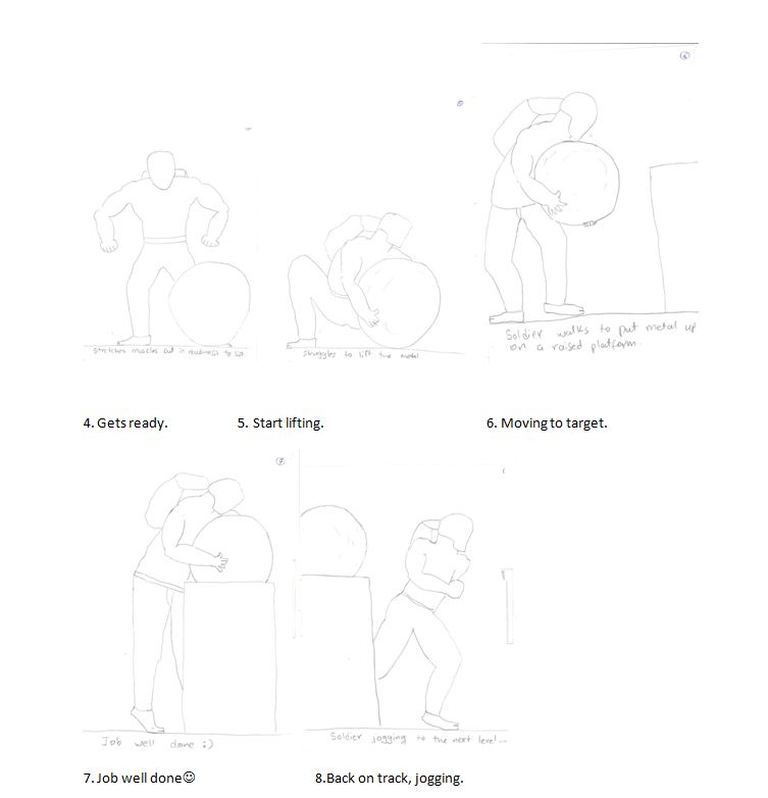
5.Summary-17.09.2010
I really had fun time making this animation and I must say am generally contented with what I was able to make. However I cannot say that I finished the job like I planned, initially I wanted to animate the soldier jogging before and after the lift as shown in my block animation but time was not on my side, maybe I was also ambitious to plan for so much .
I tried to also smoothen out the the keys but did not achieve the perfect results like I wanted, if I had more time I could handle this.
Next time I am around, I got to work pretty hard with time and come up with even better and lovely animations.
4.Animation-13.09.2010
Here comes the hardest part in this journey, this takes time and a lot of patience to get some results , at the end it of all ,you look at what you have done and feel good about it!
To begin with I started by looking out for reference from various sources.Reference pictures from The Animator's Survival Kit.

Reference from YouTube: http://www.youtube.com/watch?v=CNQT__R3G-A&feature=related
Basically in this part I first made the missing scenes between the block scenes and then changed the keys from step to various key types that suite the animations at different points in the time line.
Here is a link for my final animation online:
3.Blocking-09.09.2010
Now it’s getting more interesting, time to start with 3ds Max, I am more conversant with this program otherwise if I had an option using Maya should be first choice. This is because many friends have talked about it as a better program for animation, for now I can do with 3ds Max.
Initially I made a block animation based on scenes from my storyboard but after some consultations with my wonderful tutor, Marie, I got some good advice. I had to make adjustments in scene 3 and 4 so that they looked more natural, setting all the key frames to step keys.
This is a link to my final block animation:
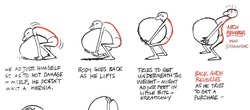
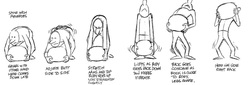
2.Storyboard-09.09.2010

Digital Acting 1 -08.09.2010
This is my first mandatory project of my second year in 3D film production, in this project we are supposed to cover character animation with the main focus on heavy weight lifting!
I first had to write down procedures through which I will use as my guide line to get this job done, this was as follows:
1. Planning.
2. Storyboard.
3. Blocking
4. Animation.
5. Summary.
I embarked on this project by first planning what I am going to do, which rig I was going to use in animating the character and also making up a story for the film. I tried out many different rigs but found out that I was more comfortable with ‘Finn’ rig (by Sebastian Antonsen) and Cryptic AR found on this website… http://www.crypticar.com.
I am comfortable with both rigs but then I decided to use Cryptic AR rig so that I can also get some experience working with it, this is because I already got enough experience using ‘Finn’ rig in my previous project. I like to try out different ways of doing things , this makes me be better prepared to meet new challenges.
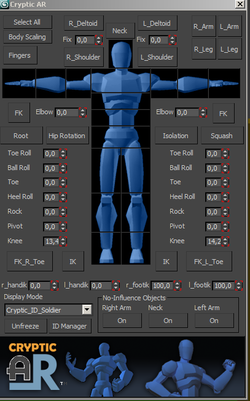
Cryptic AR is fun to use when you take some time to learn how to use it, so I hard to first dig out and learn more and this was so easy because I immediately got help online-http://www.crypticar.com/CrypticARUserManual.pdf
I got a lot of good stuff online about Cryptic AR and was really happy about the fact that I could use the character in different display modes. When I was checking the different modes on Cryptic AR picker window I came across cryptic-ID-soldier and realized that I could make my story as a soldier training……lifting a heavy metal as part of the training, this made some sense to me so I was in for it!
I first had to write down procedures through which I will use as my guide line to get this job done, this was as follows:
1. Planning.
2. Storyboard.
3. Blocking
4. Animation.
5. Summary.
I embarked on this project by first planning what I am going to do, which rig I was going to use in animating the character and also making up a story for the film. I tried out many different rigs but found out that I was more comfortable with ‘Finn’ rig (by Sebastian Antonsen) and Cryptic AR found on this website… http://www.crypticar.com.
I am comfortable with both rigs but then I decided to use Cryptic AR rig so that I can also get some experience working with it, this is because I already got enough experience using ‘Finn’ rig in my previous project. I like to try out different ways of doing things , this makes me be better prepared to meet new challenges.
Cryptic AR is fun to use when you take some time to learn how to use it, so I hard to first dig out and learn more and this was so easy because I immediately got help online-http://www.crypticar.com/CrypticARUserManual.pdf
I got a lot of good stuff online about Cryptic AR and was really happy about the fact that I could use the character in different display modes. When I was checking the different modes on Cryptic AR picker window I came across cryptic-ID-soldier and realized that I could make my story as a soldier training……lifting a heavy metal as part of the training, this made some sense to me so I was in for it!
Cryptic AR Picker Window
The Way Here
When I was growing up as a child, I can’t say I was really certain about what I wanted to be when I grow up, many times I would simply like to be what was appealing to me at that time. As a teenager i made up my mind that I wanted to be an engineer and became certain about my instincts when I realized that I actually liked both math and physics.
My ambitions to be an engineer lead me to achieve a diploma in computer engineering and I really looked forward to go further in my computer studies.
However many things happened after I graduated, I also left my home country Uganda and am now living in Norway. In Norway I have been exposed to a new environment full of opportunities and at a time when the entertainment industry was evolving pretty fast. 3D animation was getting more popular with the advancement of technology that made animation even more exciting.
It’s at this point that I picked interest in studying animation, my earlier computer studies made it easier for me to decide what exactly I could do as an animator. Watching some of my favorite animated films like King Kong and Avatar made me even more inquisitive to learn how these animations were made possible.
As an animation student, I have really been inspired to use animation as a tool of communication and entertainment. Past events can be recreated in 3d and animated to tell a story in the past, it’s from this perspective that I approached my first 3d short animated film. In this film I animated a “Finn rig”(by Sebastian Antonsen ) to tell a story about a primitive red Indian who comes to a city and is amazed by the glowing city lights. At some point he crosses a road innocently ignorant of the traffic red light on for pedestrians, and then a speeding car had to brake for him suddenly. Since the car was at high speed it could not stop instantly but continued sliding towards him and just before he is crashed he wakes up from his sleep! What a sigh for him, it was just a dream!
To make this short film I used 3dsmax, Adobe Photoshop and Adobe premiere pro CS4 software. I have been able to learn much about these software in my first year (3d & animation) and as a second year (3d film production-3DFP) student I hope to learn much more about Maya, mud box, ZBrush and many others that will be relevant in my studies.
